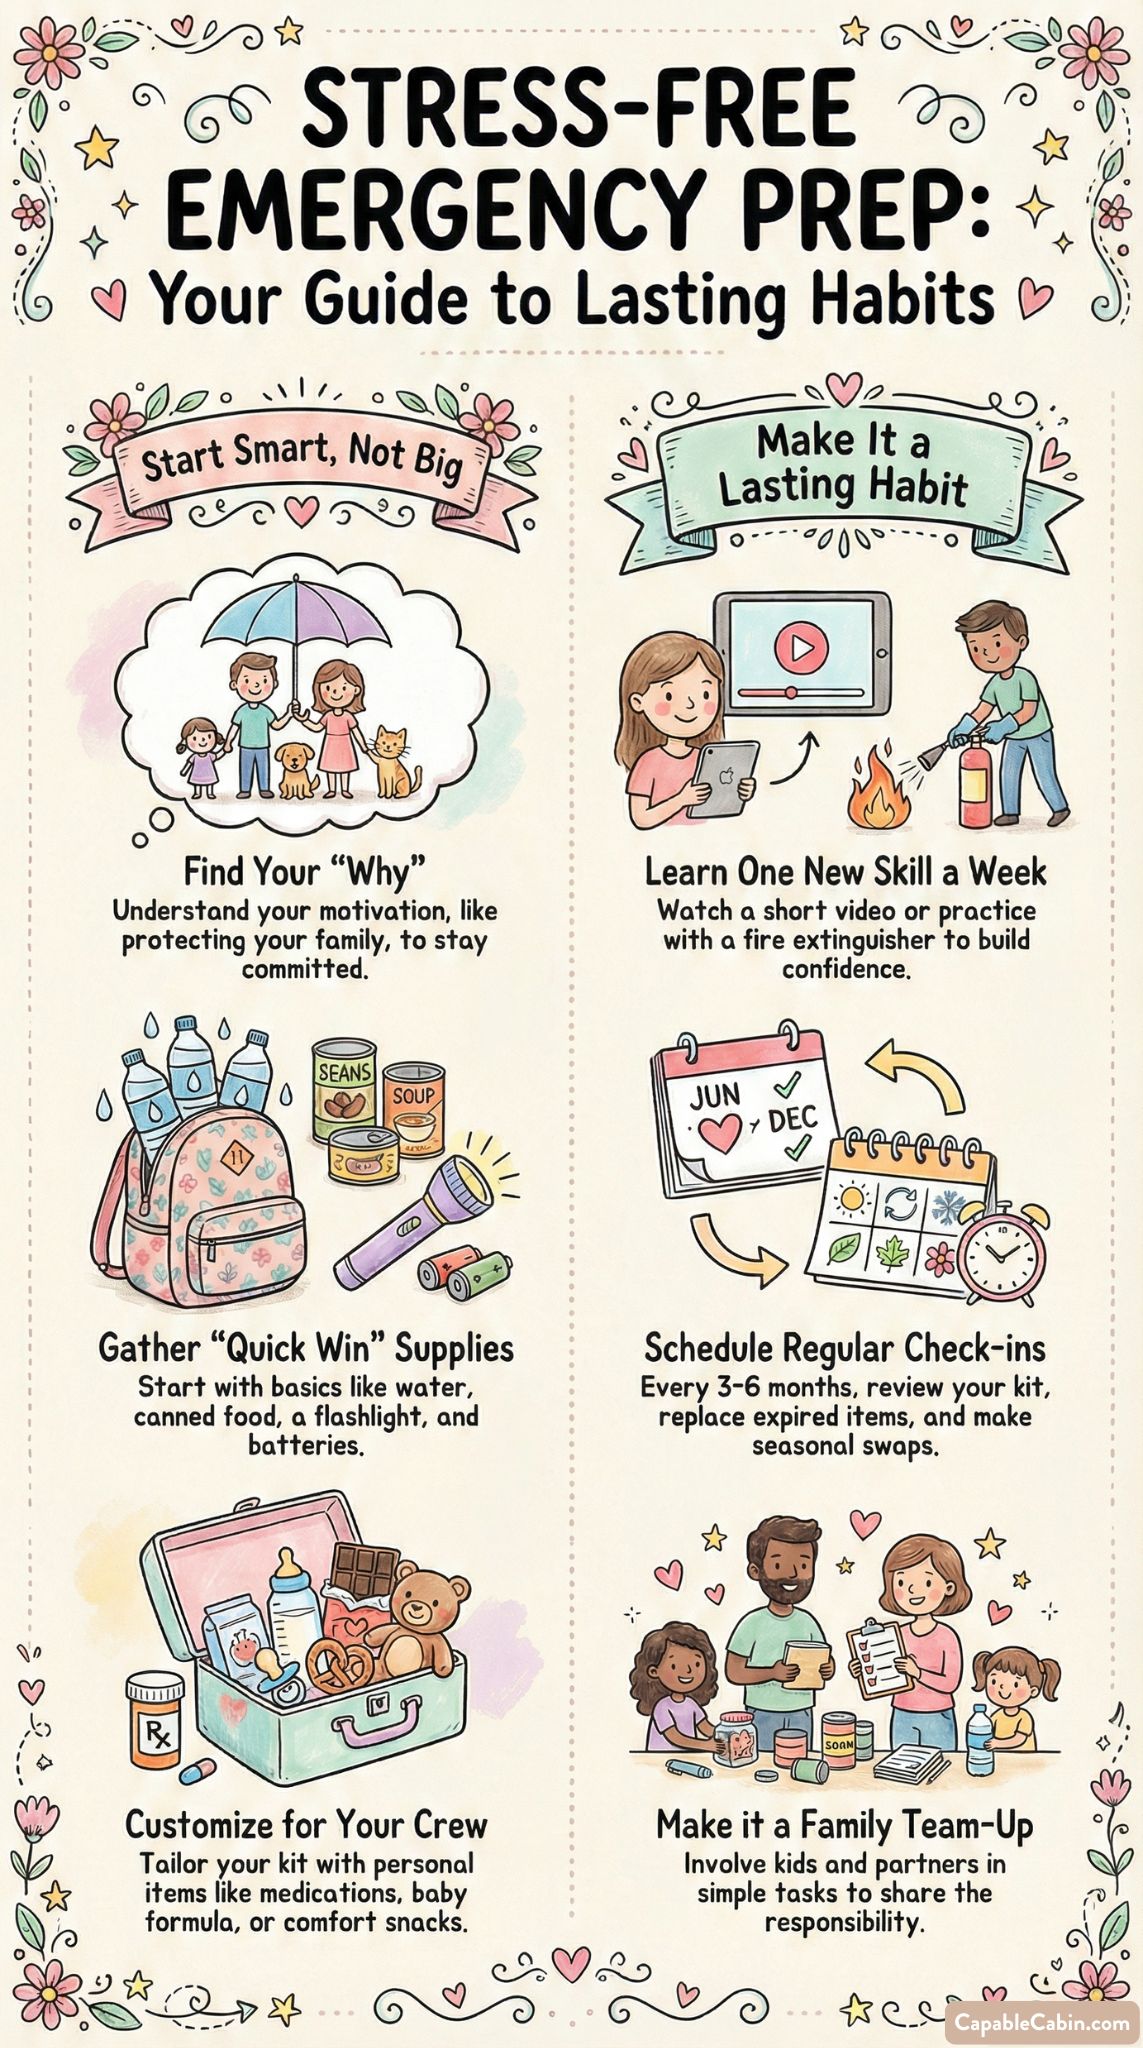
24 Emergency Kit Organization Hacks for Quick Access
You know that moment when you’re rifling through your supplies, trying to find the right bandages or flashlight in a hurry? That’s where these emergency kit organization hacks really shine. By putting everything you need in a logical, easy-to-spot setup, you’ll be able to spend less time rummaging and more time ensuring your family’s safety. And let’s be honest, if you’re juggling kids’ schedules, meal prep, and a million other “to-dos,” you deserve any shortcut you can get.
The beauty of organizing your emergency kits is that it doesn’t demand fancy gadgets or epic amounts of storage. You can repurpose everyday items and tweak a few strategies to keep essential supplies at your fingertips. Let’s walk through 24 hacks that’ll help you quickly locate whatever you need, no matter what life—and unpredictable weather—throws your way.
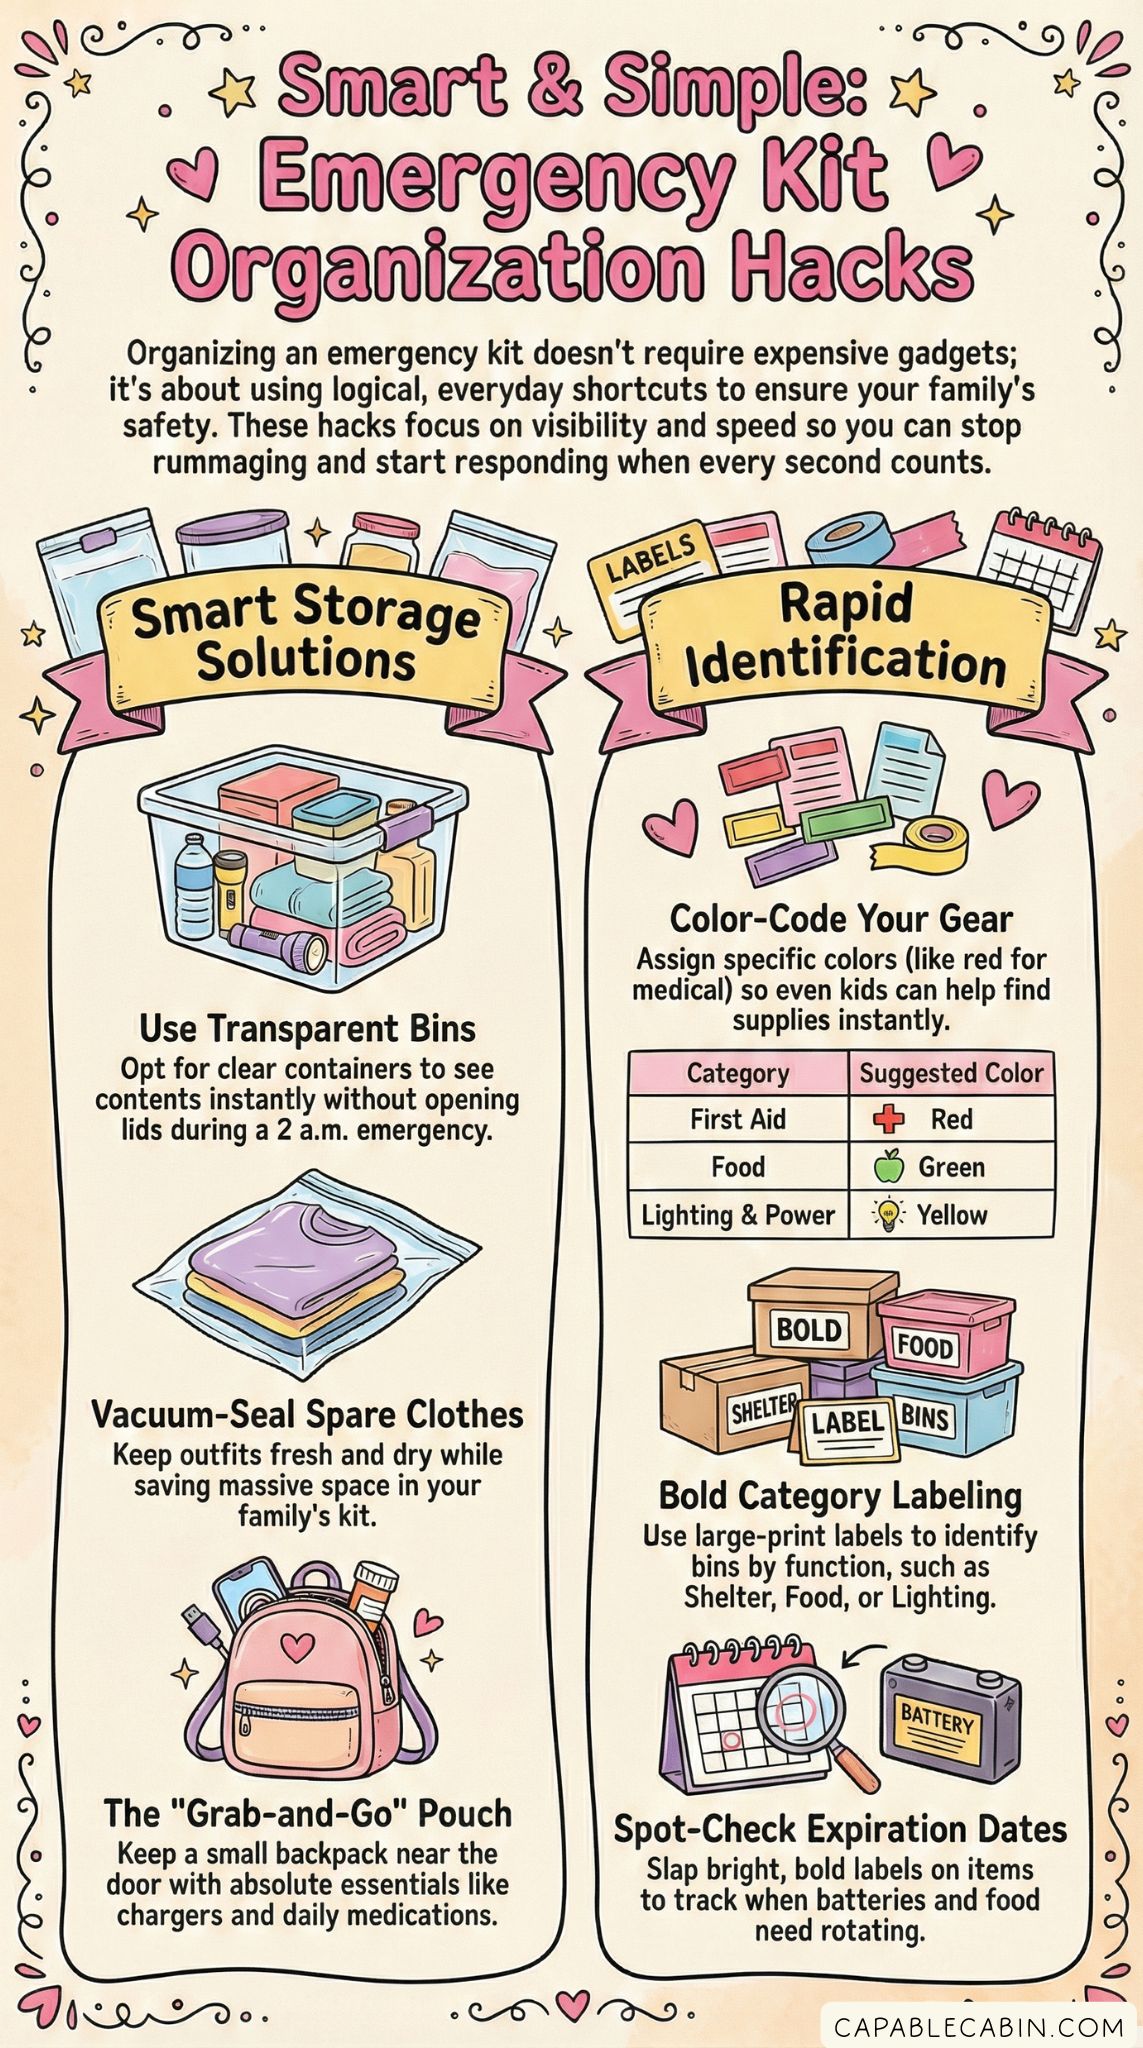
Use Clear Bins
Opt for transparent, durable containers so you can see exactly what’s inside without opening the lid. Clear plastic tubs are especially helpful if your gear is tucked away in a closet or under the bed. You’ll save time (and stress) when it’s 2 a.m. and you just need to grab those extra batteries.
- Make sure the lids snap shut tightly to keep out dust and moisture.
- If you’re short on space, try smaller clear shoeboxes. They’re stackable, easy to label, and fit in the trunk of your car if needed.
Label Categories Clearly
Even when using see-through bins, labels prevent that “where did I put the snacks?” moment. A simple sticky label or permanent marker can go a long way toward quick identification. This is especially key if you have multiple kits—like one for the car and another for your home.
- Use large-print labels that everyone in your household can read at a glance.
- Consider labeling bins by function (Shelter, Food, First Aid) so you can grab exactly what you need.
Separate Essentials By Group
It helps to group similar items, especially in larger families where supplies multiply quickly. Keep tools in one area, toiletries in another, and so on. This way, you won’t mix up first aid items with your canned food stash.
- Dedicate one section for medical, one for food and water, one for lighting and communication.
- If you’re just getting started building a complete kit, check out the 72 hour emergency kit complete for more guidance on what to include.
Vacuum-Seal Spare Clothes
There’s nothing worse than having to slip on damp, musty clothes in an emergency. Vacuum-sealing your spare outfits keeps them clean, fresh, and tightly packed. Plus, you’ll save valuable space—perfect for families who might need a change of clothes for every household member.
- Focus on versatile layers. A lightweight jacket, a warm shirt, and comfy pants should do the trick.
- Toss a couple of pairs of socks and underwear in the vacuum-sealed bag too, so you’re not scrambling later.
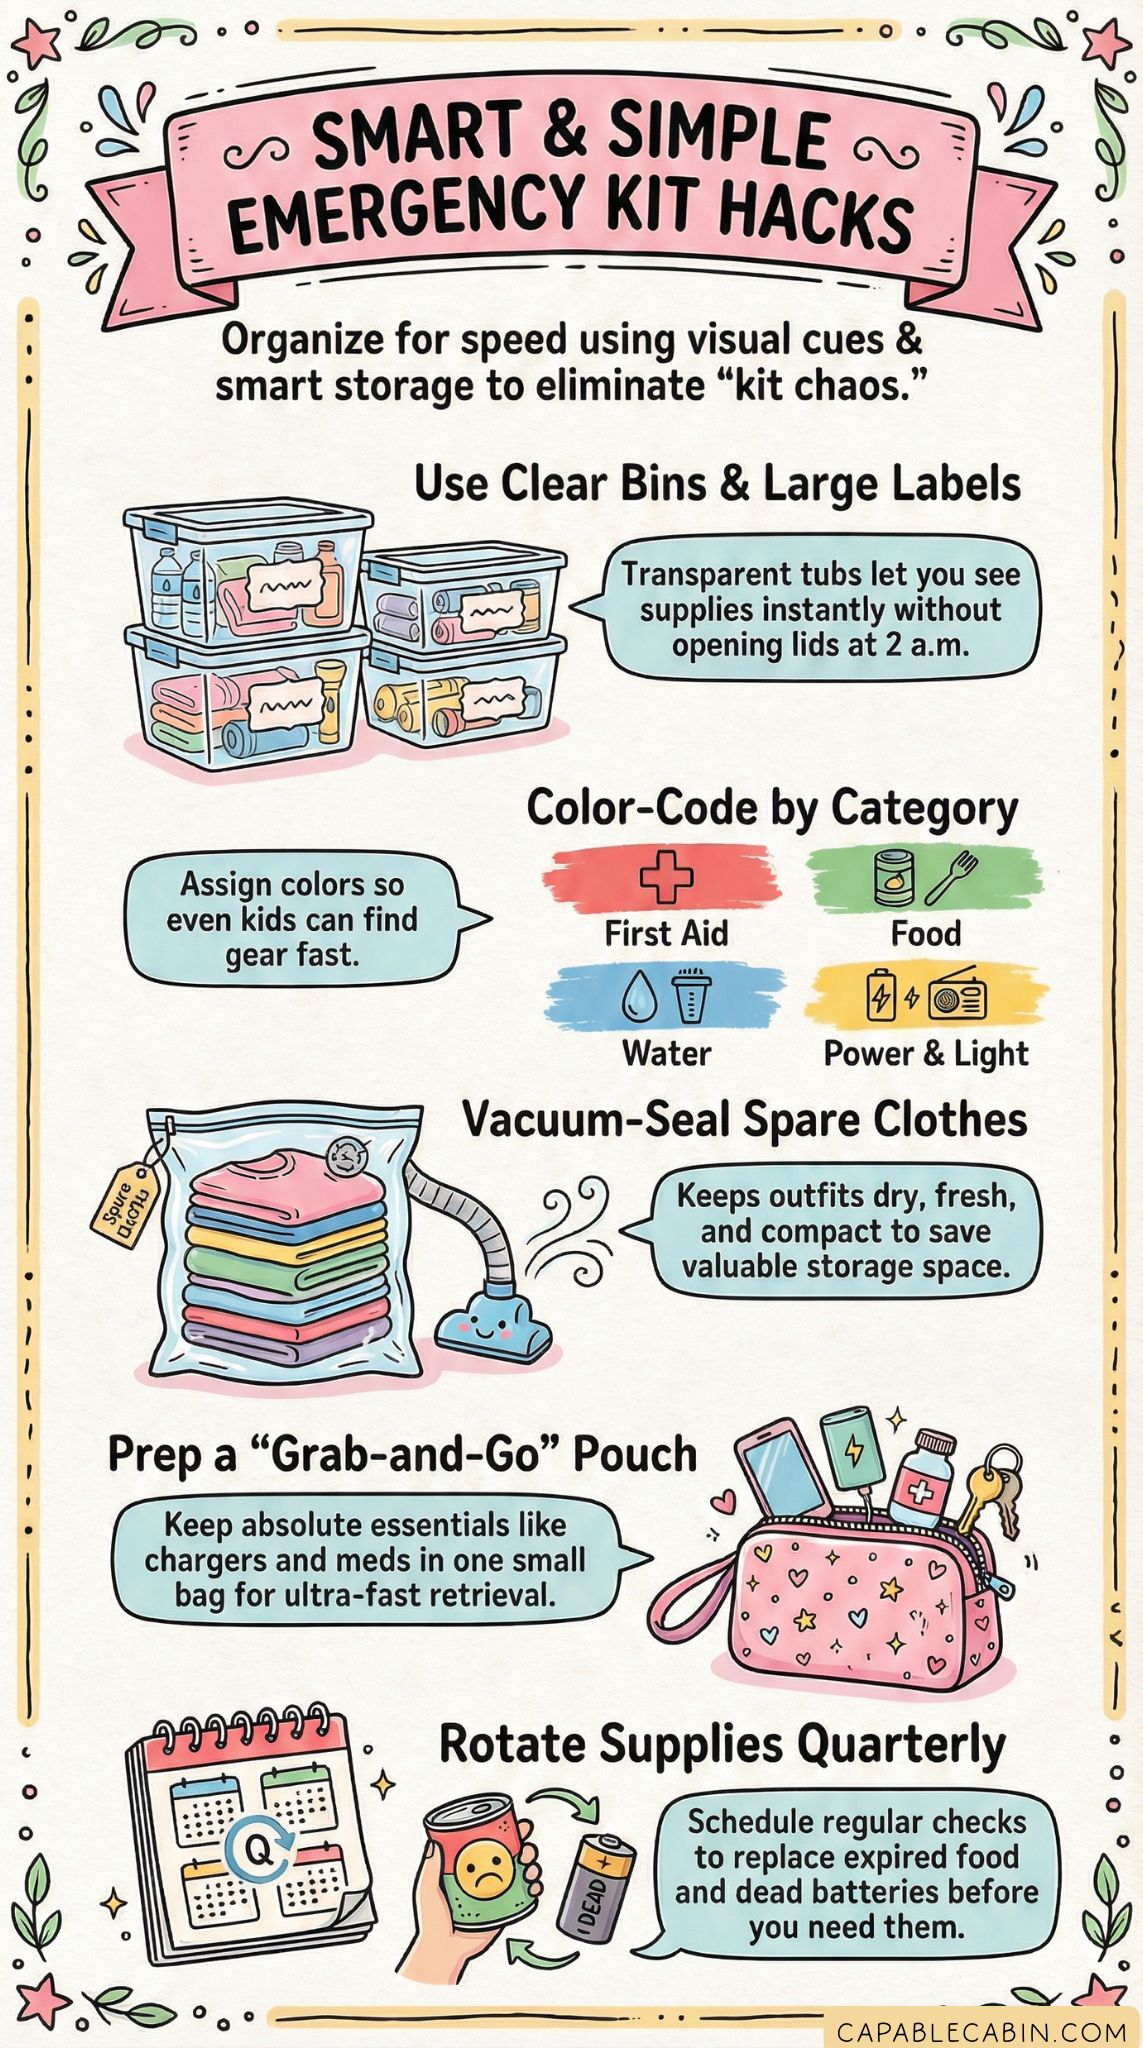
Create A Grab-And-Go Bag
Have one dedicated pouch or small backpack stuffed with top-priority items, like your phone charger, mini first aid kit, medications, and a small snack or two. You can store this bag in a larger bin or near the front door for ultra-fast retrieval.
- Lighten your load by taking only the absolute must-haves in this quick bag.
- If you rely on daily prescription meds, include a short-term supply here to ensure you’re never caught off-guard.
Color-Code Your Supplies
Assign a color to each category of gear—maybe red for first aid, green for food, and yellow for lighting and power items. Color-coding can be as easy as applying colored tape to the bins or using colored markers for labels.
- Teach family members (especially kids) what each color means, so everyone can help find or restock items.
- Keeping consistent color labels across your home kit and car kit helps you spot gear faster, no matter where it’s stored.
Tuck In Extra Lighting
Being left in the dark—literally—can make any situation more stressful. Store a few small flashlights or a headlamp on top of each container, so you can immediately locate them once you crack open a bin.
- Keep extra batteries in a small, labeled pouch nearby.
- Consider rechargeable LED lanterns if you prefer a more hands-free light source. You can also store these next to the bin for quick access.
Keep A First Aid Pouch
You’ll want a well-stocked first aid kit that’s easy to grab when someone gets a scrape or cut. Pack bandages, pain relievers, tweezers, and any special medications you might need in one dedicated pouch.
- Check out our first aid medical emergency kit suggestions if you’re unsure what to include.
- Use resealable plastic bags inside your first aid pouch to keep items sterile and sorted by type (e.g., one bag for bandages, another for ointments).
Protect Documents In Folders
Your driver’s license, insurance policies, and other vital records should be stored in a water-resistant folder or envelope. Keep a few spare copies in your kit in case the originals get lost or damaged.
- Slide a small notepad and pen in there, too, so you can take notes if the power is out or phone service is limited.
- If possible, scan these documents onto a secure flash drive for an additional layer of backup.
Stash Zip-Top Bags
From keeping electronics dry to storing leftover food rations, zip-top bags are a true superhero of emergency organization. Toss a small stack of various sizes (sandwich, quart, gallon) into your kit.
- You can use them to contain leak-prone items like soaps and shampoos.
- Write the contents or expiration date on the front with a permanent marker if you plan to use them for rationing.
Add Hooks For Tools
Whether you’re living in a smaller condo or you’re just tired of rifling through stacks of gear, hooks along a closet wall or the back of a door can create an instant organization solution. Hang your multi-tools, duct tape rolls, or rope coils on these hooks, so they’re easy to see and grab.
- You can find affordable over-the-door organizers with built-in hooks that require zero drilling.
- Just remember to keep heavier tools on sturdy hooks that can handle the weight so nothing tumbles on your toes.
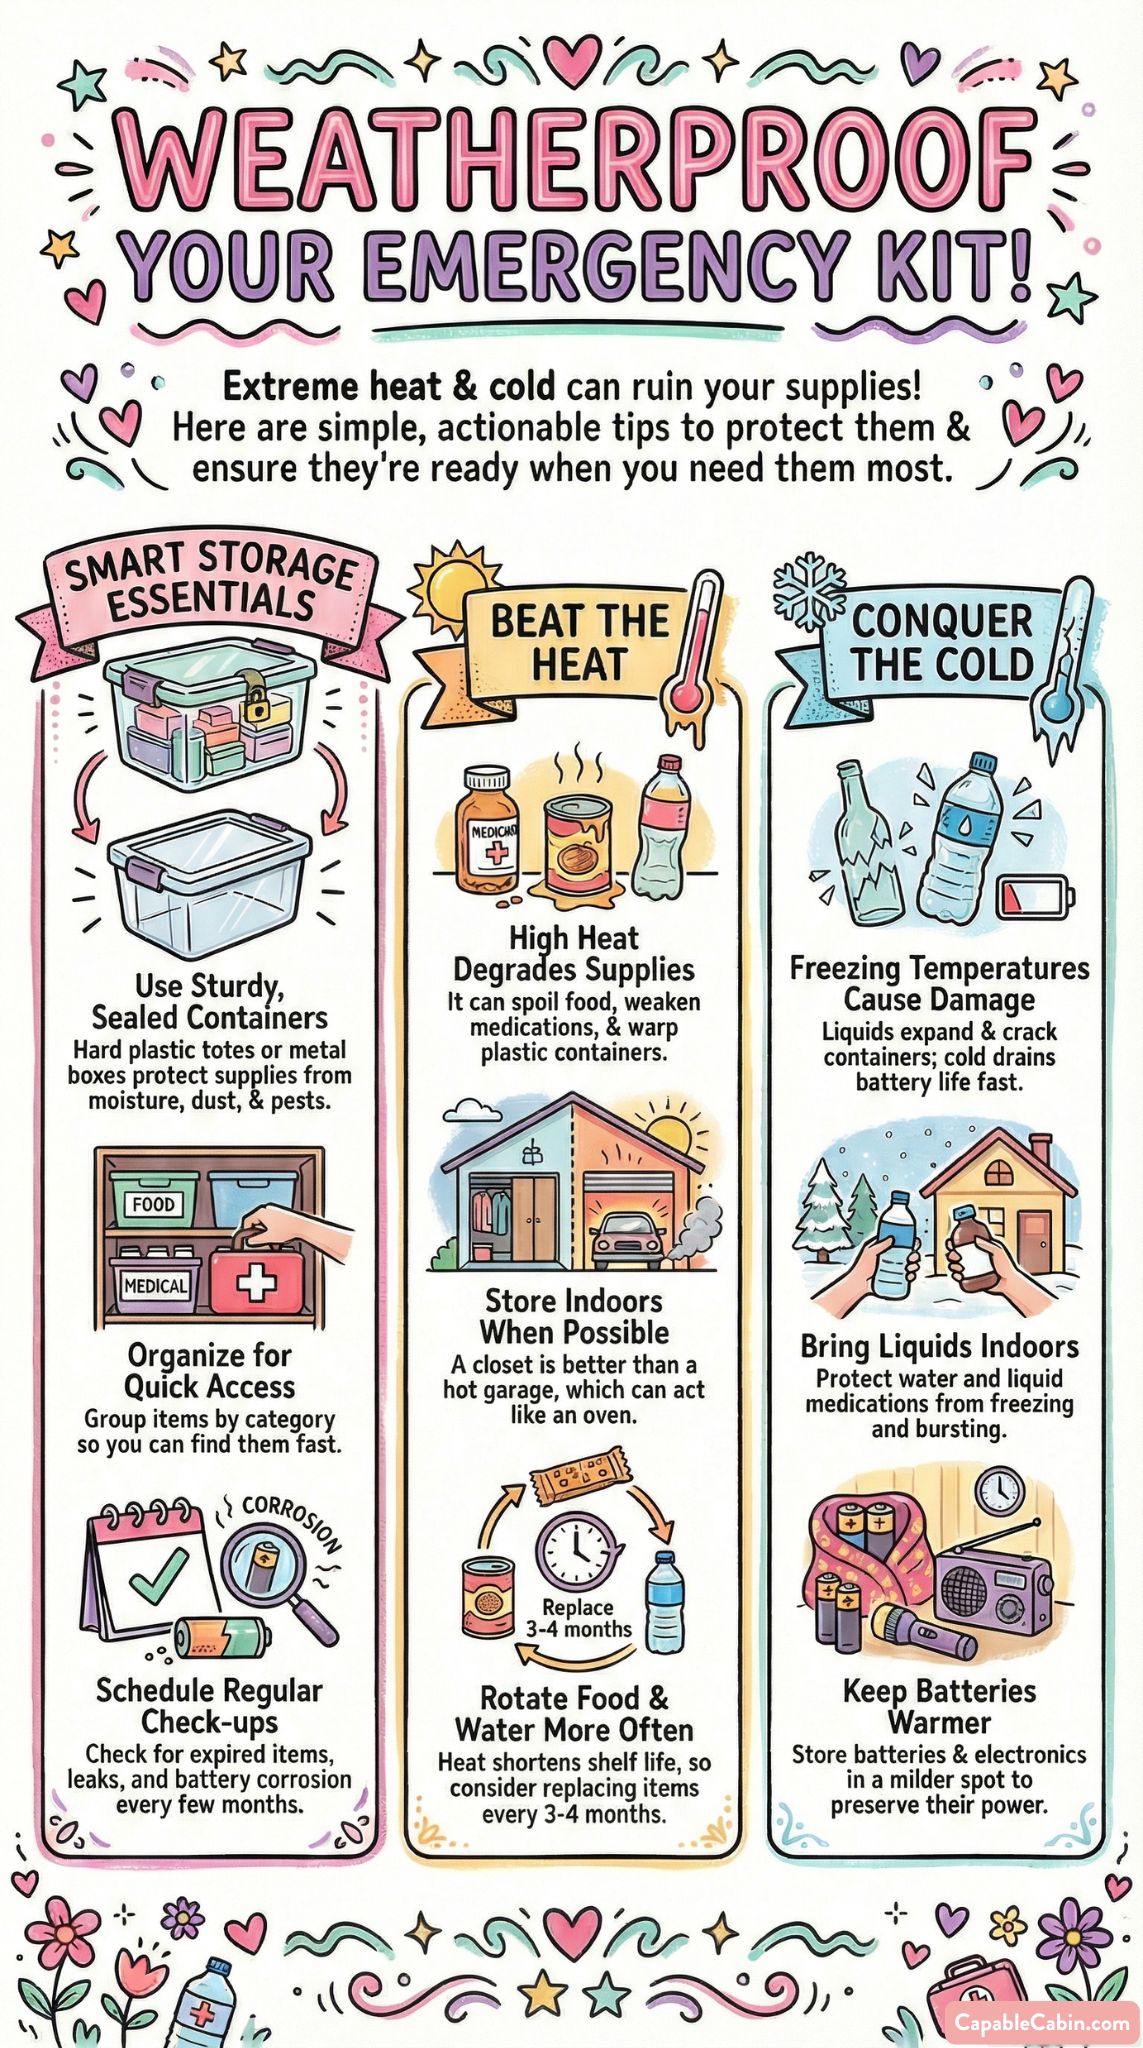
Rotate Supplies Regularly
Even the best organization system won’t help if your food is expired or batteries are corroded. Schedule a quick quarterly or biannual check to rotate or replace items in your kit.
- Jot a reminder on your calendar, or set a phone alert so you won’t forget.
- This is also a nice time to see if your family’s needs have changed—maybe you have a new medication or a bigger size of clothing for your growing kiddos.
Choose Stackable Containers
When your available space is at a premium, stackable containers can help you build upward instead of outward. Choose stable bins that won’t topple and that fit well on top of each other.
- Stick to the same brand or model for uniform sizes and easy stacking.
- Stacking also comes in handy if you plan to store multiple kits. For instance, you might have a home kit, a vehicle emergency kit family, and a separate workplace emergency kit guide each in different bins.
Store Liquids In Leak-Proof Bottles
Keep water purification tablets, rubbing alcohol, or any liquid-based item in sturdy, leak-proof containers. If you can’t stand the idea of your entire kit smelling like antiseptic, believe me, you’ll want to go the extra mile here.
- Slip the liquid bottles into individual zip-top bags for double protection.
- Make sure each bottle is clearly labeled so there’s no confusion or accidental misuse.
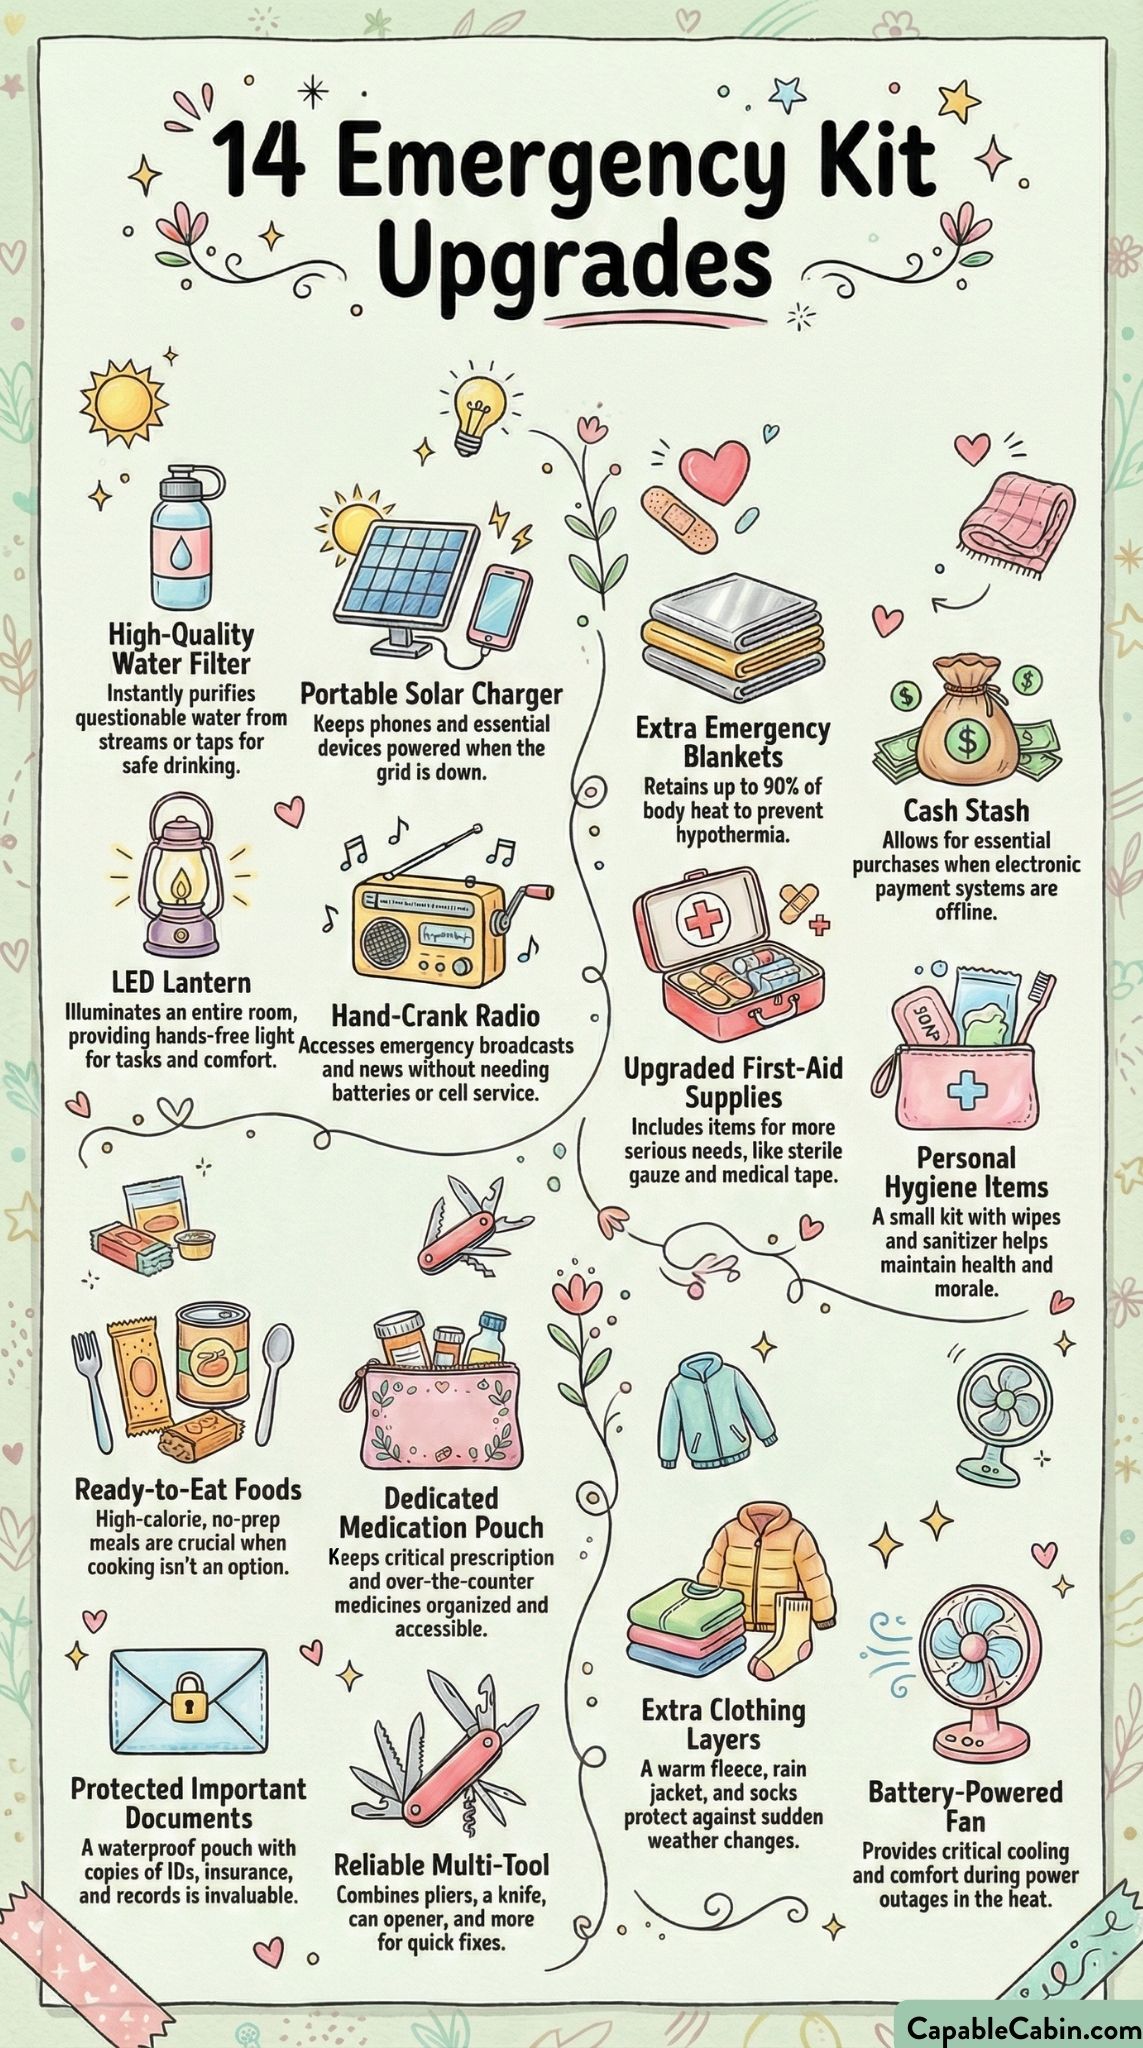
Keep Cash And IDs Handy
In emergencies, ATMs might be offline, and digital payment options could be spotty. Tucking a small envelope of cash and photocopies of important IDs inside your kit is a tremendous relief when you need to make a quick purchase.
- Consider storing small bills if you can, making it easier to pay exact amounts when credit card machines aren’t working.
- Keep the envelope separate from your food or water compartments to avoid accidental water damage.
Dedicate A Single Shelf
If you have shelf space available, dedicating one shelf specifically for your emergency supplies can work wonders for quick retrieval. A single shelf means everything is in plain sight, so you won’t forget about items pushed to the back of a closet.
- Keep heavier items like bottled water at knee or waist level for safe lifting.
- Label the edge of the shelf so that even family members or babysitters know where to look if you’re not home.
Try Pocket Organizers
Those hanging shoe pockets? They aren’t just for footwear anymore. Pocket organizers, often draped over doors, can hold flashlights, canned goods, small first aid kits, and more. Use each pocket for a particular type of item and label it if needed.
- These organizers are especially handy in tight spaces, making them a go-to for small space emergency preparedness.
- Ensure the pockets are designed to handle the weight of whatever you’re planning to store—some pockets might rip if overloaded with heavy cans.
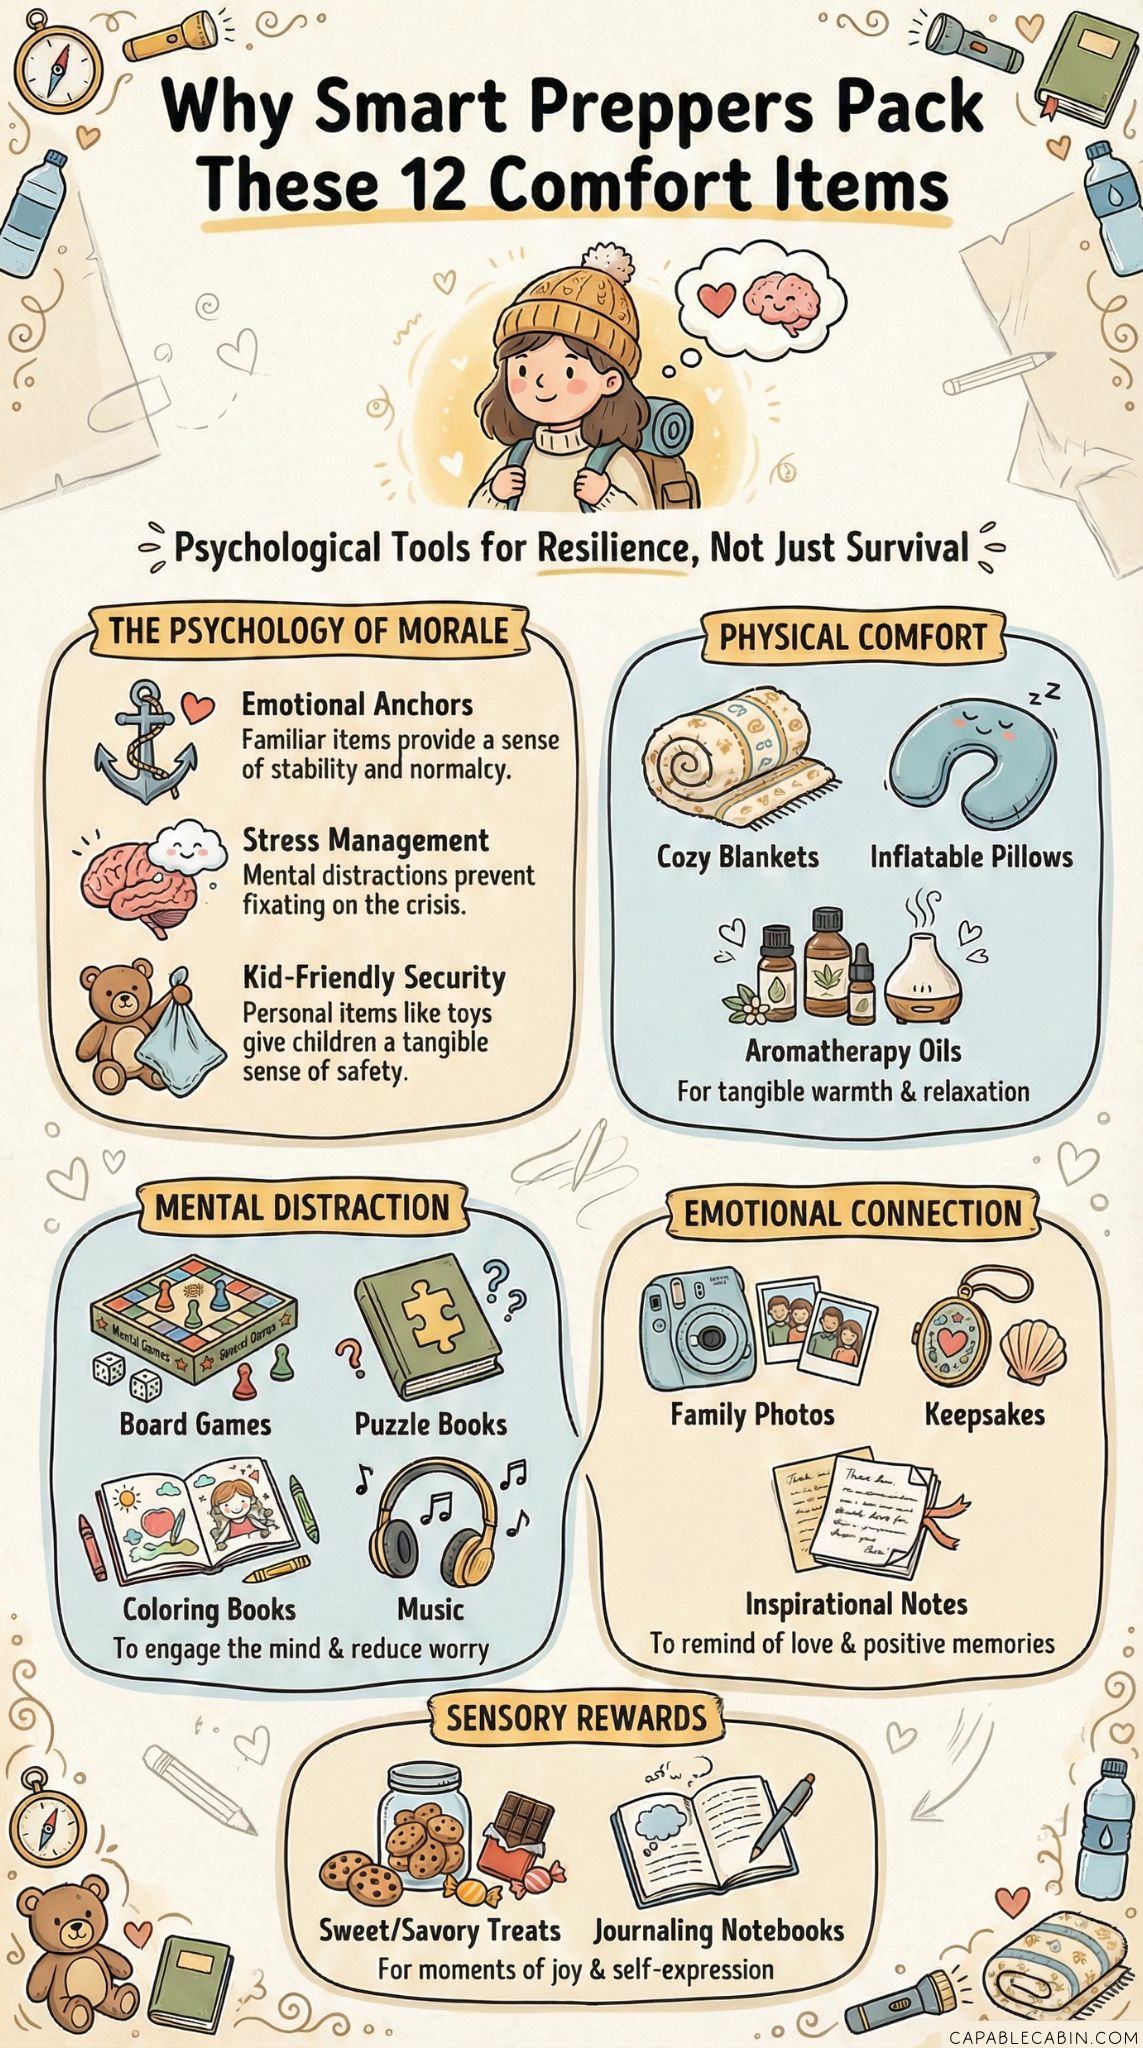
Plan For Kids’ Comfort Items
Children feel safer when they have a familiar toy or blanket, so why not keep small comfort objects in your emergency kit? Label a small pouch for each child with a plush toy, favorite snack, or even a family photo to help soothe anxiety in a crisis.
- Don’t forget an age-appropriate activity, like a small coloring book or a travel game, to keep them occupied if you’re stuck waiting out a storm.
- If you’re looking for more ideas to help your kids feel safe, you might also check kids emergency preparedness confidence.
Divide Food Into Packets
Cramming a big box of granola bars into your kit might seem convenient, but smaller packets allow for easier distribution and help prevent waste. Portioning your food also helps with quick rationing if you need to share among several family members.
- Ensure each packet is labeled with the expiration date.
- Place these smaller packets in a sturdy container so they don’t get crushed beneath heavier items.
Label Expiration Dates
Batteries, canned goods, even certain medical supplies all have a shelf life. Slap a bright label on each item with the expiration date in bold letters. An easy-to-spot date can be your reminder to rotate or replace.
- For more pointers on replacing outdated items, see emergency supplies expiration replacement.
- Use removable labels or stickers so you can update them after you restock.
Group Tools Together
Keep things like a small wrench, multi-tool, can opener, and pliers in one designated bag or pouch. That way, if you need to fix a broken pipe or open a can with a stubborn lid, you’re not searching multiple places for the right tool.
- Tuck in a roll of duct tape here too—it’s an all-purpose wonder in emergencies.
- If you’re worried about losing smaller objects, consider a fanny pack or zippered pouch where it’s impossible for them to slip out unnoticed.
Prep A Car Kit
Another layer of preparedness is having a scaled-down emergency kit in your vehicle. Fill it with basic first aid supplies, a flashlight, blankets, snacks, and water for unexpected breakdowns or road closures.
- If you want a more structured approach, check out our vehicle emergency kit family guide.
- Remember to inspect your car kit regularly to replace anything that gets used or expired.
Designate A Meeting Spot
This isn’t exactly a “storage” hack, but it’s crucial for situations where your family might get separated. Decide on a place inside your home to gather during a sudden emergency, plus an outdoor location for events like fires or earthquakes.
- Post a small map or written instructions near your emergency kit, so even babysitters or extended family know where to go.
- Keeping your kit close to that meeting spot also makes sense—it’s easier to grab everything and assemble quickly.
Involve Your Household
It’s tempting to organize everything yourself, but involving your spouse, kids, or roommates ensures everyone knows what’s in the kit and where it’s located. That way, you’re not always the “keeper of the stuff.”
- Host a quick family drill: open the bins, show everyone how to use a radio or flashlight, and let them see how items are organized.
- You can even assign mini “jobs” to younger children, like checking the expiration dates or labeling new items.
Cabin Chat
Below are a few common questions people tend to have once they start building or reorganizing their emergency kits. Hopefully, these lighthearted Q&As make the process feel even more approachable—and remind you that you’re never going it alone.
- How often should I restock items?
Plan to do a quick review every six months. Check for expired products, swap out seasonal clothing, and recharge or replace batteries. You can tack this onto your spring-cleaning or back-to-school routine. - Do I really need a separate kit for my car?
If you’re on the road often—commuting or shuttling kids around—yes. A car kit acts as a backup for roadside emergencies or unplanned overnights. Even a small kit with a blanket, snacks, and a flashlight can provide huge relief. - My kids always dip into our stash when they’re hungry. Is that a problem?
It’s only a problem if you forget to replace what they’ve taken. A simple fix is to store your emergency food out of everyday reach or pack items they aren’t tempted to eat regularly. Rotating these items is essential to keep everything fresh. - How big should my emergency kit be?
There’s no one-size-fits-all. It depends on your household size, your location, and the types of emergencies you’re most likely to face. Start small with essentials, then build as you go. If it’s become overwhelming, break it into sub-kits like first aid, food and water, and tools. - What if I have virtually no spare room in my house?
Many of us feel space-challenged. Utilize vertical storage, like that single shelf or behind-the-door organizer. You can also slip slim containers under a bed or couch. If you’re looking for more tips, take a peek at small space emergency preparedness. - Should I store a kit at work?
If possible, yes. A basic “desk survival kit” with snacks, water, a flashlight, and basic first aid supplies can help if you get stuck in the office during a storm. - Is there such a thing as being over-prepared?
Honestly, it’s more about balance. You don’t need to drain your bank account or turn your home into a bunker. Just stay mindful—having your essentials in one place helps you avoid panic buying and last-minute scrambles.
Putting together and maintaining an emergency kit might not feel glamorous, but it’s one of the best ways to safeguard your family’s future. By trying out these 24 organization hacks, you’ll create a system that’s easy to manage and quick to access—even if you’re juggling a dozen other responsibilities. You’ve got this, and every small step is a stride toward peace of mind. When the unexpected hits, you’ll be glad you took the time to plan, label, and stash away these essentials. After all, knowing you can handle a crisis is one of the best feelings in the world.