10 Clever Ways to Store Your Emergency Kit (Even in Small Homes)
Life can get hectic, and in the swirl of managing schedules, meals, and everything else, it’s easy to overlook where you’ll stash that trusty emergency kit. Yet having effective emergency kit storage solutions can be the difference between calmly grabbing what you need in a crisis and scrambling to find scattered supplies. If you’ve ever felt that twinge of uncertainty—wondering if you could quickly locate your first aid materials, flashlights, or extra snacks in a pinch—trust me, you’re not alone. We’ve all been there, trying to keep our families safe without dedicating an entire room to disaster planning.
But here’s the encouraging part: you can tackle this step by step, fitting your emergency kit right alongside the rest of your household essentials in a way that feels natural. Let’s walk through ten versatile storage solutions that keep your kit easy to find, well-organized, and ready to go whenever life throws a curveball.
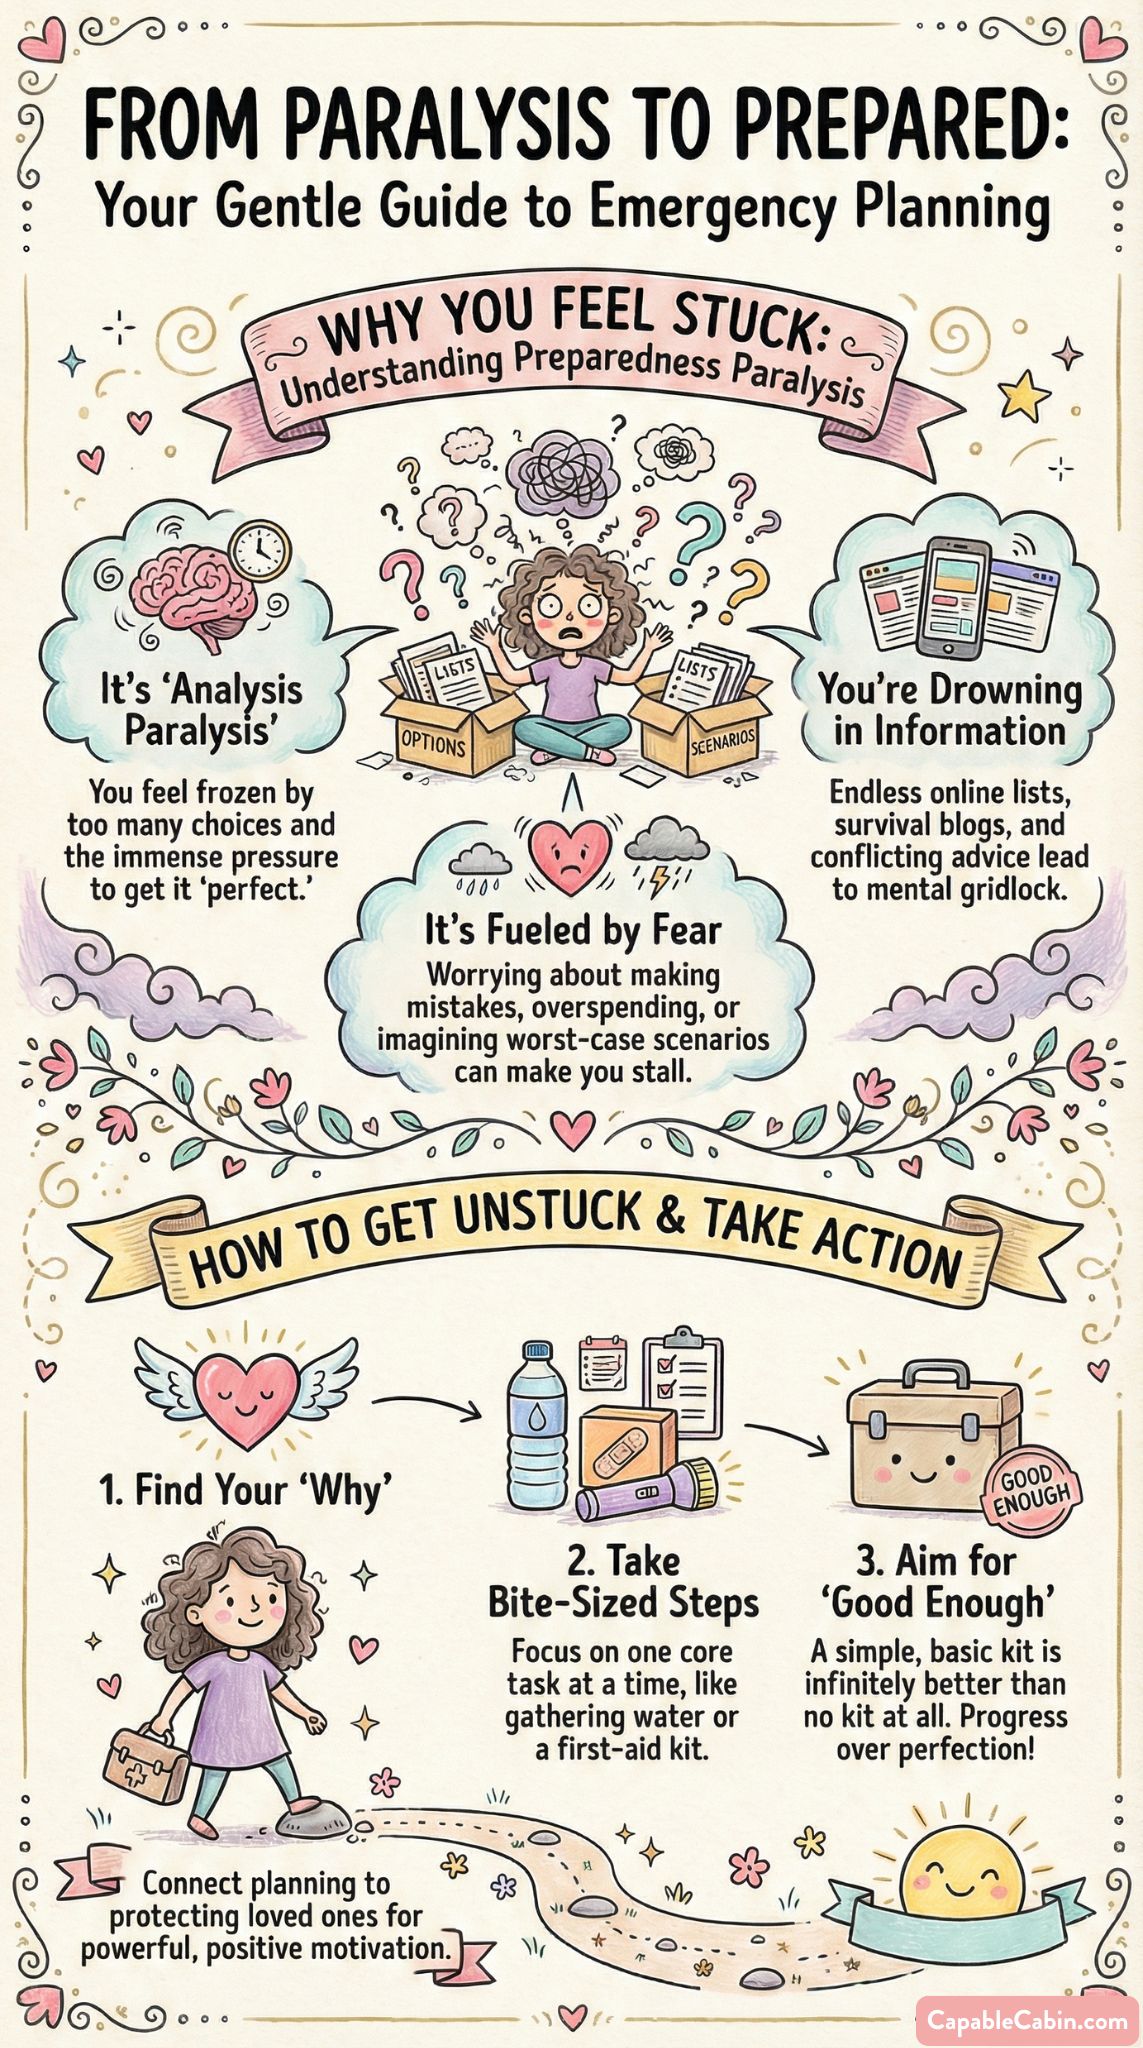
Why Safe Storage Matters
Before diving into our curated list, let’s talk about why storing your emergency kit the right way is so important. You might already have flashlight batteries and canned foods scattered in different places: a few items in the kitchen, some stashed in the garage, maybe a couple of first aid items in a hallway drawer. That’s a good start, but here’s the thing: in a real emergency—whether it’s a nasty storm or a last-minute evacuation—you want to reach your supplies fast. You don’t need the added stress of rummaging through cabinets or turning your closet upside down.
Storing your kit properly not only speeds up the process of locating what you need, it also helps maintain those items in good condition. Batteries can corrode if they’re left in humid spots, and food can expire if tucked away in a corner you rarely check. A good storage strategy also makes it more likely you’ll keep tabs on your kit, rotating supplies when necessary and replacing what’s used or out-of-date. If you’re not sure how to build that kit in the first place, you might find inspiration from the 72 hour emergency kit complete. Once you have your core items, it’s all about finding the perfect home for them inside your house.
Ready to see some tried-and-true ideas? Let’s do this together, one storage option at a time.
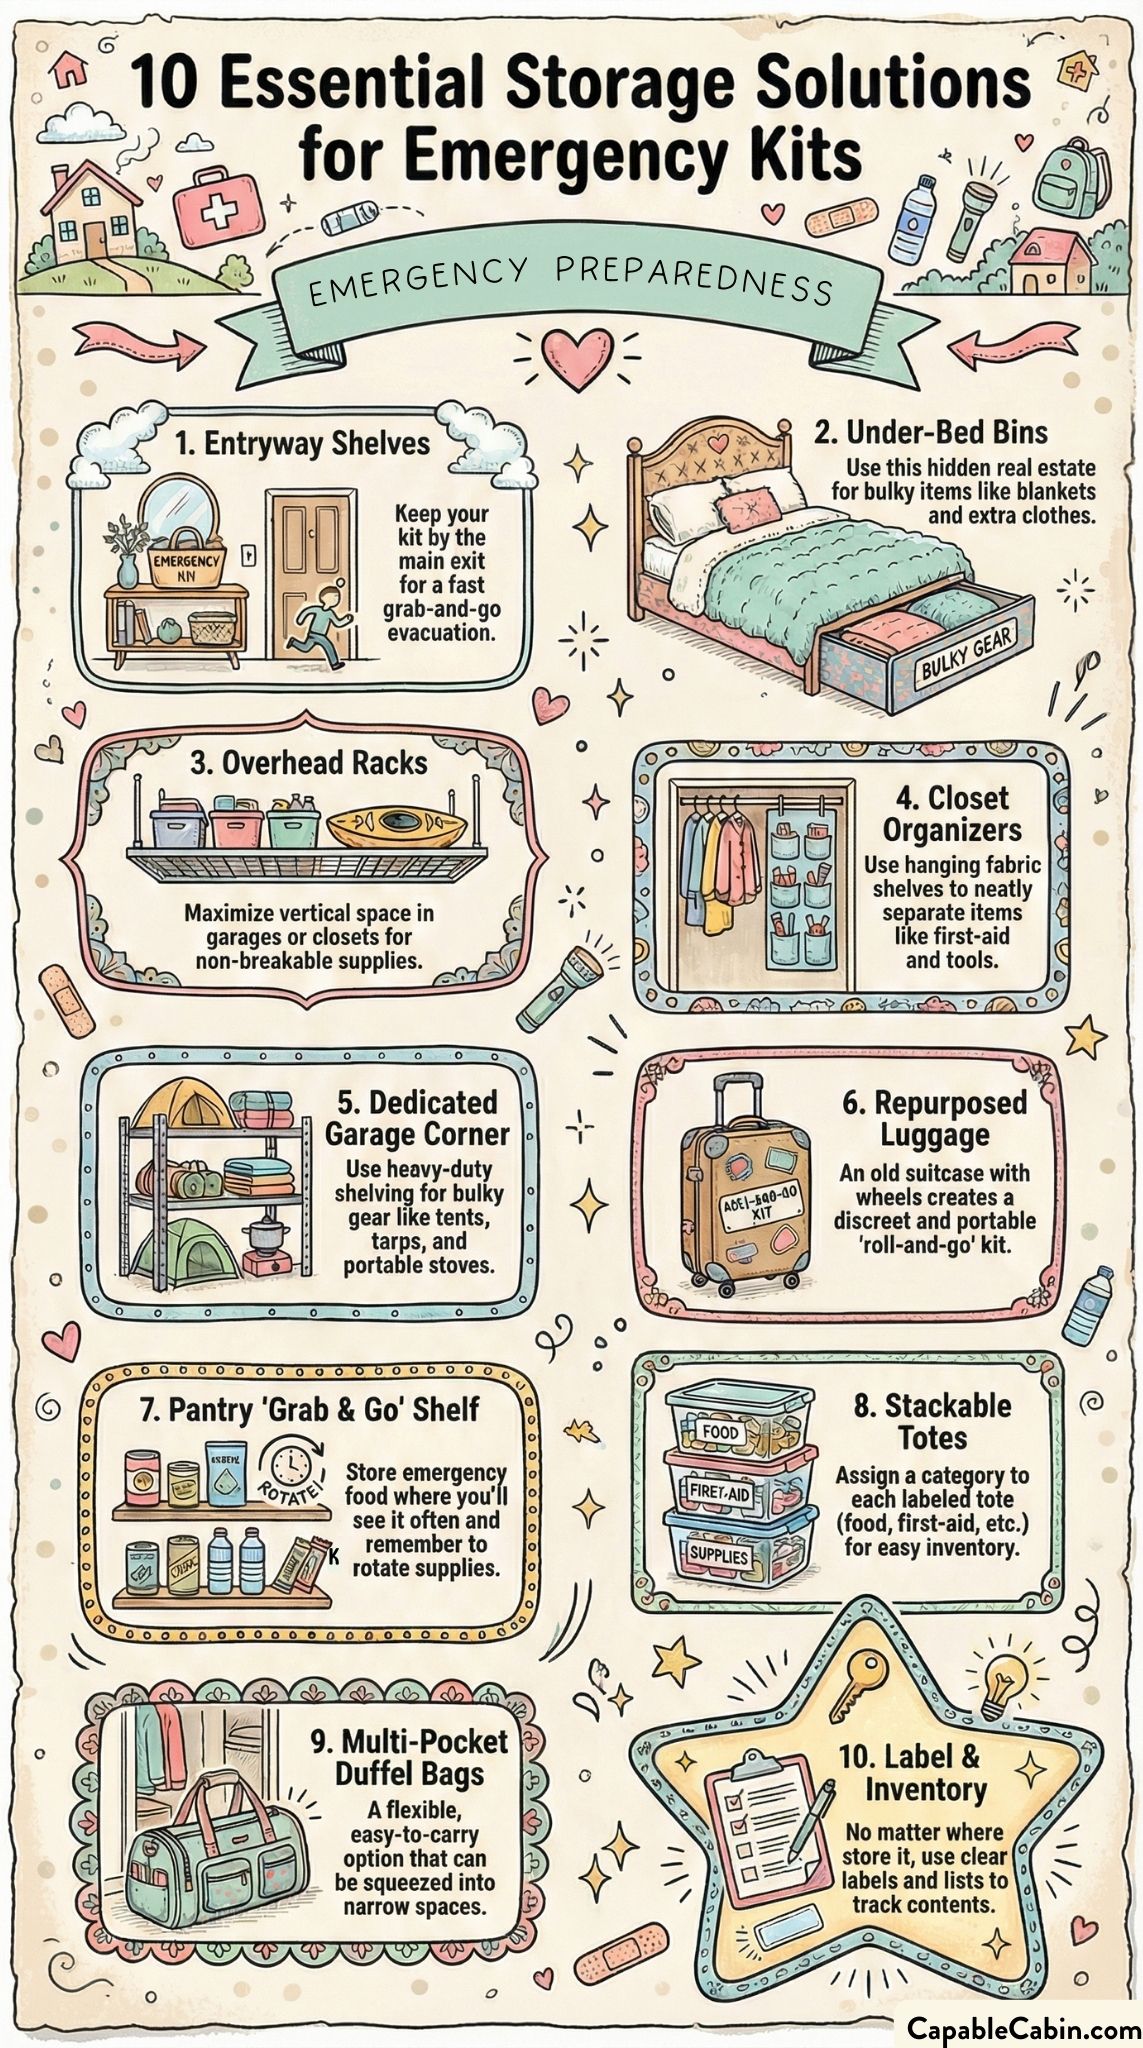
Optimize Entryway Shelves
One of the simplest ways to keep your emergency kit accessible is to store it on the shelf by your main entrance. Think about it: that’s the door you typically leave from, right? If you’re facing an unexpected evacuation, you want to grab your kit quickly. By placing your kit in a bin or basket on an entryway shelf, you won’t forget where you put it.
- Use a labeled plastic bin so items stay protected from dust, humidity, and regular household clutter.
- Keep essential documents (like copies of IDs, insurance policies, medical info) in waterproof folders within this bin, so it’s all in the same place.
- If you’ve got kiddos, consider storing a child-friendly version of the kit within their reach—like a small bag of snacks or extra clothing—just in case.
This is also a great place to hang an easy-to-see checklist of your kit’s contents. If you like tracking your progress, check out emergency kit organization hacks for more simple methods to label and inventory everything. Sure, your entryway might be smaller than you’d like, but if you can carve out one decent-sized shelf, you’re already leaps and bounds ahead of the rummage game.
Use Under-Bed Storage Bins
Under-bed storage is prime real estate you might be overlooking. If you live in a smaller space or simply need to free up floor area, sliding a bin beneath the bed can be a total game-changer. As far as emergency kit storage solutions go, this ranks high for saving room while keeping things accessible.
- Choose a sturdy plastic bin with wheels. That way, you can pull it out in a matter of seconds.
- Label the lid clearly—something like “Emergency Supplies” or “Family Go-Kit”—so you’ll know immediately what’s inside.
- Tuck items like blankets, extra clothing layers, and sealed packages of non-perishable foods here. It’s also an excellent spot for any accounts of your medical history or a small stash of baby items if you have an infant.
Another bonus: smaller kids can help you retrieve supplies from under the bed. It’s a simple way to get the whole family involved in preparedness, reinforcing the mindset that we’re all in this boat together. You’re not just preparing for a crisis; you’re creating a nimble, easy-access system that fosters a bit more peace of mind.
Try Overhead Hanging Racks
If floor space is at a premium—especially in areas like apartments—consider installing an overhead storage rack. This is especially helpful in garages, utility rooms, or large closets. Overhead racks typically come with sturdy metal frames you can secure to the ceiling. You then place plastic bins or tubs on top, keeping your kit safely tucked away but still reachable with a step stool.
- Opt for bins with latchable lids to protect items from dust or insects.
- Keep heavier items lower in the bins to prevent them from toppling out if you tilt them.
- Store only non-breakable supplies overhead, such as blankets, ponchos, or older shoes you might need in a flood scenario, and keep breakables (like glass water bottles) elsewhere.
Yes, it’ll take a bit more effort to set up sturdy overhead racks, and you may need handyperson skills—or a handy friend—to install them. But if you’re short on closets or living in a compact home, overhead storage might just be your new best friend. It’s a way to reclaim that unused vertical space while knowing exactly where to find your gear.
Leverage Closet Organizers
You probably already use closet organizers for your belongings, so why not devote some of that space to your emergency kit? Hanging closet organizers, especially those fabric ones with separate shelves or compartments, can hold your gear in neatly labeled sections. That way, you can keep like-items together: first aid supplies in one slot, flashlights in another, kid essentials in another.
- Go for organizers with at least four or five compartments, so you can group similar items together.
- Label each compartment or use see-through pockets so you’ll recognize what’s inside at a glance.
- Keep regularly-rotated items (like batteries or prescription meds) in the top compartments to make them easier to replace.
This works great in a hallway closet, especially if you want to keep everything out of sight. If you ever need to expand your kit beyond these compartments, or if you’re searching for ways to balance limited space, small space emergency preparedness might give you more tips on creative organization.
Keep a Garage Corner Kit
If you’re fortunate enough to have a garage, dedicating a small corner shelf to your emergency kit can be a lifesaver. It’s often the most natural place for storing items like tents, tarps, portable stoves, or other bulkier gear you might not want in the house. The trick is ensuring it’s still easy to grab if you have to evacuate fast.
- Use heavy-duty shelving units meant for garages, with enough clearance for large storage bins.
- Group your items by category: water and food, first aid, comfort items, tools.
- Include a small step stool nearby so you can safely access upper shelves.
Just remember, garages can get hot or cold, so check your supplies regularly for temperature-related damage. Some items—especially certain medical supplies—might degrade in extreme climates. If you’re worried about that, a quick read of store emergency supplies extreme climates might help you protect those essentials.
Repurpose Luggage Spaces
Have an old suitcase you’re not using? That rolling luggage can double as a discreet, portable emergency kit container. This is a classic trick for folks who like to keep their kit out of sight but still want to grab it at a moment’s notice. Plus, with wheels, even heavier items like water bottles or canned goods become more manageable to move around.
- Choose a suitcase with a hard shell for extra protection.
- Organize items using smaller pouches or zip-lock bags inside the suitcase, so you can easily retrieve what you need without rummaging.
- Keep the suitcase in a closet near an exit, or under a bed if it fits, for quick retrieval.
Parents find this especially helpful if they have older luggage lying around. It’s also a good plan if you want a “roll-and-go” method for easy evacuation. And hey, if you ever upgrade your kit to a bigger container, you can always revert the suitcase to travel duty (after removing perishable supplies, of course). Win-win.
Create a Pantry “Grab and Go”
Your pantry is already a hub for food and water, so dedicating a “grab and go” shelf for your emergency kit can make a whole lot of sense. Place items that have shorter shelf lives—including certain snacks or bottled water—up front where you’ll see them often and remember to replace them before they expire.
- Use clear plastic bins labeled “Emergency Food,” so in a stressful moment, you’re not mixing it up with everyday groceries.
- Keep a smaller bin or bag of high-protein snacks and instant meals within reach, especially if you have teens who might need an energy boost.
- Consider storing water purification tablets or a small supply of paper plates and utensils here, too.
This setup offers the added bonus of frequent visual reminders that your kit is there and might need refreshing. If you’re ever uncertain about how to handle food storage broadly, you can look into building a thorough emergency food storage kit, making sure you have plenty of shelf-stable options. Seeing those items in your pantry every day might give you that gentle nudge to stay on top of your preparedness routine.
Store in Stackable Totes
Sometimes, the simplest approach is best: standard stackable totes are easy to find, simple to label, and can be tucked away in a corner of your basement or spare room. Even if you have a bigger family and a more extensive kit, you can manage these totes in neat columns. Just remember to place heavier totes at the bottom.
- Break down your kit by category, each in its own tote: one for first aid, one for food and water, one for clothing or blankets, etc.
- Write the contents on a piece of paper taped to the front, so you can quickly scan what’s inside without opening them all.
- Keep a small inventory sheet listing expiration dates, so you’ll know at a glance if you have items to replace soon.
Stackable totes are ideal if you’re planning a thorough re-check every season or two, whether that’s rotating out supplies that might spoil, replacing batteries, or checking that clothes still fit growing kids. A system like that ties in nicely with an overall emergency preparedness maintenance plan, where you schedule periodic updates. Best of all, once the totes are stacked, you’re not losing precious floor space.
Use Multi-Chamber Duffel Bags
Prefer something flexible and easy to carry? Multi-chamber duffels might be right up your alley. Perfect for folks who might need to relocate in a hurry, these soft bags give you plenty of pockets for first aid items, toiletries, and other must-haves. Because they’re not rigid, you can squeeze them into narrow closets or corners.
- Pick a duffel with large compartments, multiple side pockets, and sturdy carrying handles or shoulder straps.
- Sort items by function, like “personal care,” “electronics,” and “medical.” Place each category in a different pocket.
- If your family uses them for sports or weekend trips, tape an obvious label on top that says “Emergency Essentials—Do Not Remove.”
Duffels can be easier to maneuver in real-life scenarios: you can toss one in your car, carry it up the stairs, or hand it to an older kid to transport. The only caution: be mindful of how the fabric holds up in wet conditions, especially if you’re storing it in a damp basement. Check it every few months for signs of mildew or moisture damage.
Label and Inventory Thoroughly
No matter which physical storage solution you choose, labeling and inventories are what keep your system running smoothly. Life changes—kids grow, dietary needs shift, new medical prescriptions might emerge—so you’ll want to update your kit accordingly. An organized, clearly labeled approach means you don’t have to guess which bin holds the water or which shelf you put the flashlights on.
- Use color-coded stickers, one color for each category of items.
- Keep a small binder with up-to-date inventories, plus notes on when to replace certain supplies.
- If you have multiple kits (like one for home, car, or work), label them accordingly and consider placing them near an exit or close to where you’d naturally need that particular kit. For instance, your vehicle emergency kit family should ideally stay in the trunk.
A good labeling strategy also keeps you on top of the dreaded “I forgot to replace the batteries” moment. Hey, we’ve all been there. But with a solid system, you’re less likely to be caught off guard when you need to rely on these supplies. Think of it as an ongoing relationship with your emergency kit: the more you nurture it, the better it serves you in a crisis, giving you that supportive reassurance we all crave in tough times.
Stay Prepared With Confidence
In the whirlwind of daily life, it’s comforting to have a plan. By choosing the emergency kit storage solutions that fit your home layout and personal style, you’re setting yourself up for success if (and when) the unexpected occurs. Yes, it takes some initial legwork—finding the right bins, labeling everything, maybe rearranging a closet or two—but once your kit is secure and accessible, you’ll feel an enormous sense of relief.
Just imagine how reassuring it will be to say, “All our emergency supplies are stored right there. We can grab it in seconds if we need to.” That level of preparedness doesn’t require a huge house or a massive budget. It just calls for a few practical tweaks to your storage plan and a gentle commitment to routine upkeep.
We’re all in this together, cheering each other on. Whether you’re in a tiny apartment or a sprawling suburban home, you can make your emergency kit easy to grab and fully stocked without sacrificing your limited square footage. If you want ideas on how to stretch your budget while building your kit, check out budget emergency preparedness kit. Then, keep refining your storage system as your family grows or your home setup changes. Over time, you’ll fine-tune the perfect approach for your unique space.
Remember, your kit isn’t just about supplies—it’s about restoring calm during those uncertain moments. You’re doing a huge favor for yourself and your loved ones by taking these steps. Keep going. You’ve got this.
Cabin Chat: Common Questions
Below are a few questions we hear a lot when it comes to stashing emergency supplies. We hope these answers spark fresh ideas and help tighten up your own plan.
- How often should I check on my stored emergency kit?
It’s a good habit to give it a quick glance seasonally—say, every three or four months. You’ll want to ensure batteries still work, food isn’t expired, and clothes still fit the kids. If you notice worn packaging or see that a certain snack is approaching its expiration date, go ahead and swap it out. - What if I don’t have enough closet or shelf space?
Don’t sweat it. Repurpose items you already own, such as suitcases, large backpacks, or small rolling carts. If you have only minimal room, compartmentalize your supplies, then stash them in unconventional spots like under beds or on top of cabinets. This is where a strategy like the small space emergency preparedness approach can really help. - Should I keep part of my kit in my car?
Absolutely, especially if you drive frequently. It makes sense to store some essentials right in your trunk. A vehicle emergency kit family is handy if you get stuck on the road or face an evacuation away from home. Just be mindful of temperature-sensitive items—plan to rotate those out more frequently. - How can I protect important documents in my kit?
You can slip them into a water-resistant sleeve or laminate them. For extra security, keep those documents in a sealed plastic bag placed in a sturdy binder or folder. Some folks also digitize vital documents, storing them on an encrypted USB or uploading them to the cloud, just in case. - Any tips for keeping kids involved with kit prep and storage?
Make them little helpers in labeling bins or picking out snacks to include—kids often love being part of adult tasks. Explain in simple terms why these items matter. This way, they’ll know exactly where to grab a flashlight or a bandage if you ask for it. Including them boosts their confidence and prepares them for emergencies without making it scary.
With a few simple steps and a bit of regular upkeep, your emergency kit can stay front and center in your home—without clutter taking over. Here’s to peace of mind, easy-to-grab supplies, and the comforting knowledge that you’re ready to face any unexpected moment head-on. Keep up the good work. You’ve got everything you need to safeguard your loved ones, and we’re right there cheering you on.